Let’s get moving
We recently came across an issue regarding the animation of certain characters in Trifox. As it turns out, creating animations for anything that has more than 2 legs is hard.
Creating animations for a body shape that doesn’t really fit inside a capsule shape … even harder.
In this article we will go over why this is so hard to pull off and what we can do to work around this without having the luxury of a dedicated animation team.
All through the wonders of procedural animation.
This post doesn’t go into all the niddy griddy details on how the core procedural locomotion functions on the technical side of things. There are already quite a few excellent resources available regarding that on the web.
Instead we go over the thought process of solving a problem. Breaking it down into solvable sub problems and setting up the different layers and elements that all add up to creating a procedural and scaleable movement setup that feels natural and believable.
Doing it by hand
Situation 1 – When things go well
With a character (such as a humanoid) you can often get away with a series of animations for each of the main directions your character can move in. (Forward, backwards, sidestep left and sidestep right.)
These animations can then be blended in real-time using something called a blendspace.
The blendspace basically looks at a number parameters such as movement direction and speed to determine how the different animations should come together.
Below you can see the locomotion of our main character up close and how the core blend tree is set up.
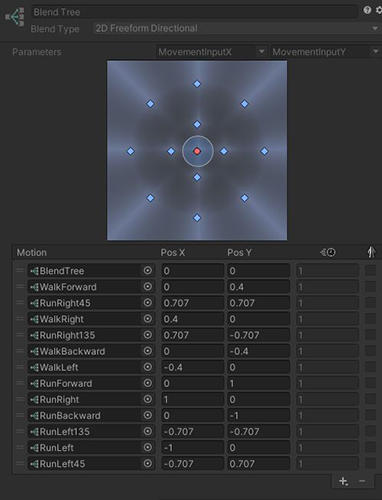
In the example of Trifox, our main character also has specific animations for the diagonal movements. The more dedicated animations you can provide the nicer the result will be.
In this case the different animations all keep the body fairly centered. This makes it easy to blend everything together without really noticing the transitions, it all just feels rather natural.
Even when rotating the character, the animations hold up quite well. We don’t really need to add any specific animations that take into account the full combination of rotation, movement and speed.
Situation 2 – When things go…
Let’s meet our problem character.
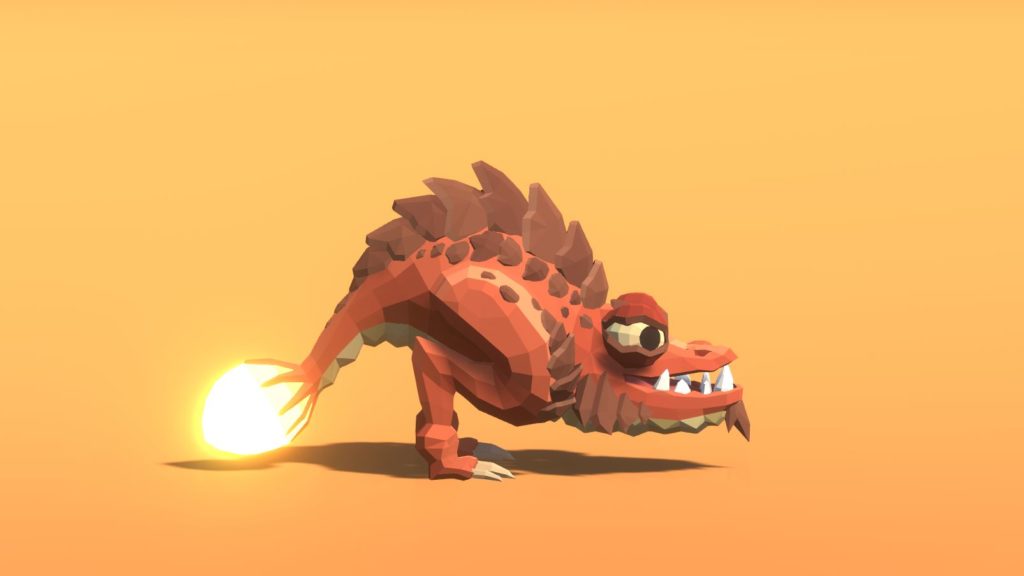
A friendly little dragon lizard with a lovely tail and elongated body.
In this first example the same approach was used as with our main character,
a fully manual animation driven approach.
Because of the shape we do have a blend setup with animations that take rotation and direction changes into account.
Mainly because it would look weird if the character didn’t lean into making it’s turns when moving quickly.
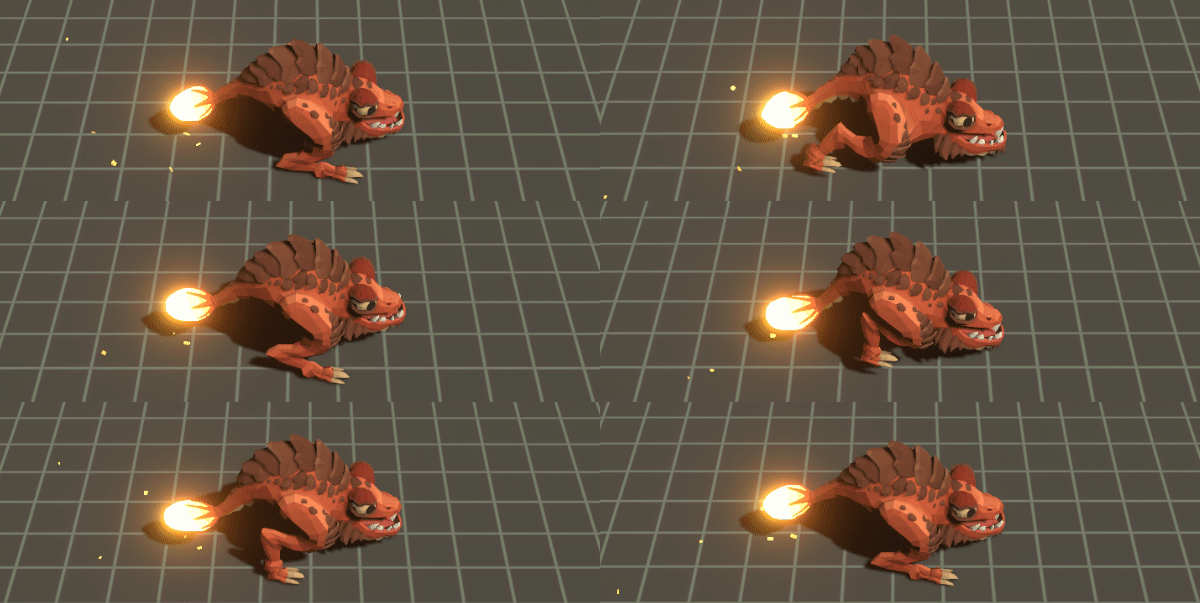
All in all the results aren’t so bad. At least until we start adding some points of reference to our scene…
Yeah…
Not so great…
So what is going wrong here?
There are a couple of issues that really stand out:
- First off the rotation would require the movement logic of the character to be handled differently. In Trifox our characters have independent movement and rotation control. This means that the movement direction can be doing one thing while the rotation/orientation of the character is doing something completely different. For example running backwards.
For the character curling that is showcased in the animation to be usable, the movement should always be handled in a single direction (forward of the character) and the rotation should then be in full control of the direction. That way the character would always turn in an arc instead of doing an in place 180° direction change. - There’s no real history to the tail movement. It doesn’t really sell the transistion from one direction to the other by just doing the animation blend. Especially when dealing with a lot of back and forth.
- Footsliding sucks. When you get the correct movement speed going everything is great. However, during transistions and with variable movement speeds the sliding of the feet on the surface isn’t something that looks or feels all that amazing.
Possible solutions:
- We could add a whole bunch of inbetween animations that would help solve this problem. Spending a long time creating the perfect animation set for each possible situation.
- Another solution would be to alter the movement system. But that wouldn’t be a guaranteed success and it could bring with it a whole other set of issues. It would also require a number of setup changes, something that we would rather avoid.
Both solutions have the requirement that the rotation speed, movement speed and animations need to be finely tuned to eachother.
Any change to one of these elements could break the setup and require a rework of the animations.
With limited time and budget in mind, non of these routes seemed like a viable option to tackle our problem.
The only way forward was clear … it was time … time to enter the world of
? PROCEDURAL ANIMATION ?.
Let’s get procedural
Breaking down our character
Before we can get all procedural it can help to first understand the character and the different elements that need to be tackled in order to create a believable set of motions.
This allow us to tackle each problem individually and perhaps set things up in a way that makes the solution usable for more than this single character use case!
Lets take a look at our lizard.
After close examination we were able to determine that there are 4 big elements that are needed to have this character move and behave in a realistic way.
(Spoiler: there is actually a 5th bonus element but more on that later)
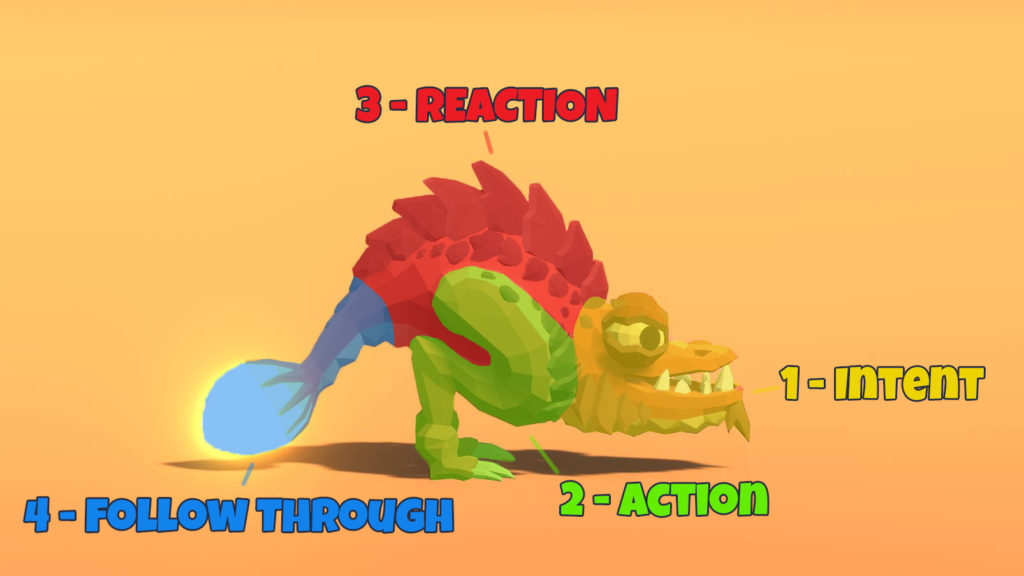
- Intent
The head should indicate the desired movement direction and rotation. Enhancing the player feedback of what the character is doing. - Action
This is core movement of the procedural animation, the locomotion, the movement that drives it all, the positioning and animation of the legs. - Reaction
The body should respond to the action. If the leg moves so should the body to enhance and sell the movement. - Follow Through
The tail should follow the movement of the rest of the body, it’s the dangly bit that goes wherever you go but with a tiny delay. Completing the movement of the character
Where do we start?
With the different requirements revealed we can get to work on solving each problem and defining dependencies and priorities.
For example, the action/reaction part of the setup will most likely require the most work. The reaction will need the result of the action so this will need to be implemented after the action part.
The intent and follow through on the other hand can stand on their own and are considerably more straight forward to implement. This makes them an excellent starting point for our setup.
The starting point
The first step is to make sure there is no animation present on our character. That way we will see the exact results of what we are doing without any other movement or animations interfering with the results.
Wiggle that tail (Follow through)
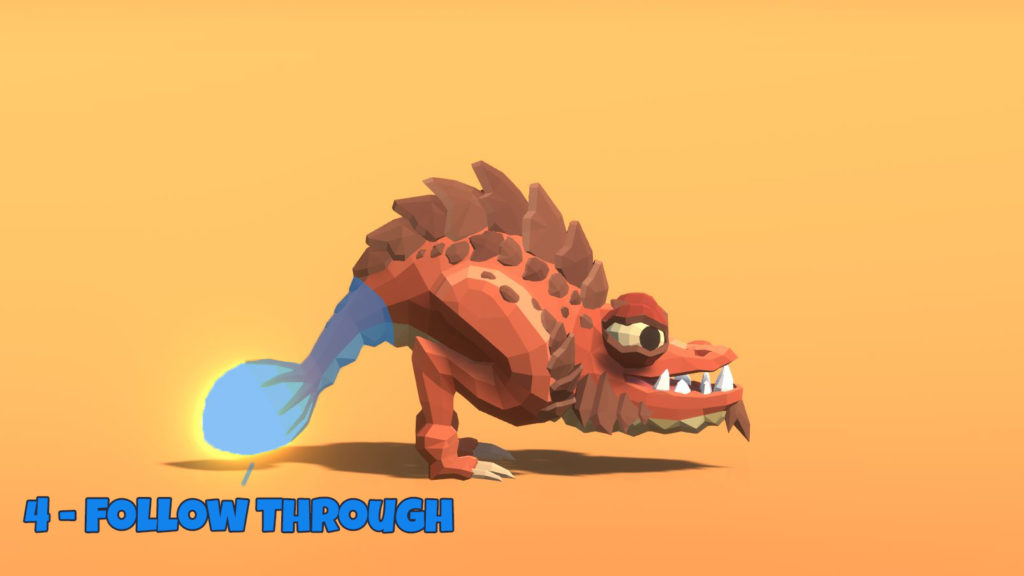
Perhaps somewhat counter intuitive we start out with the end section of our animation setup, the follow through.
As mentioned before, this is a system that can stand fully on its own. So it makes sense to just get it out of the way.
Additionally it will give us quick results in terms of getting the overall desired full body motions into our character.
For this we made use of a Unity asset called Dynamic Bone (https://assetstore.unity.com/packages/tools/animation/dynamic-bone-16743).
This asset provides a simple system that basically adds fake physics to your character bones, often referred to as “jiggle bones”.
You could also write your own system for this but when trying to be cost effective this solution is more than sufficient. An added benefit is that the source code is also available, making it easy to make adjustments if needed.
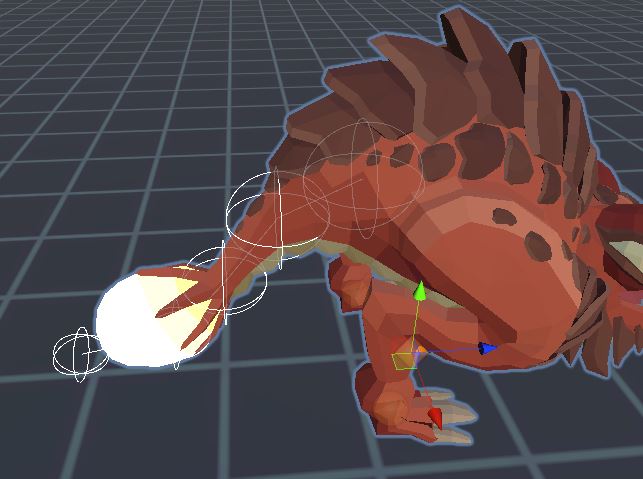
I’m watching you (Intent)
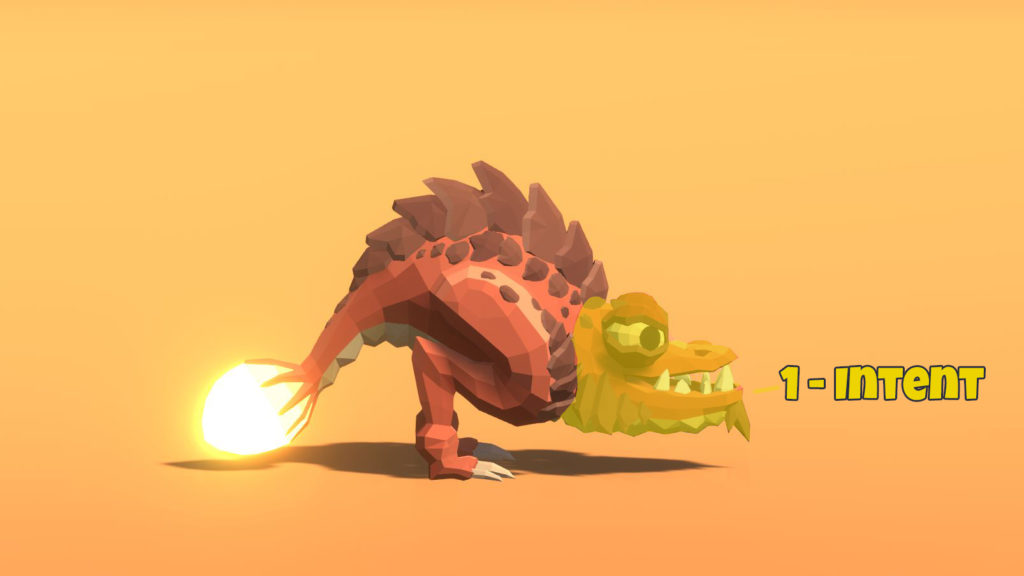
Similar to the follow through, the intent (aka our head movement) can stand perfectly on its own.
As you can see in the clip below, having both the intent and the follow through in place already adds a whole lot of lovely motion to the character.
The body curls nicely when rotating in place and when moving.
Because we aren’t blending to predefined animations, the directionality matches perfectly with the actual movement intensity, speed and orientation.
Using Inverse Kinematics
In order to achieve this effect we make use of a technique called Inverse Kinematics (IK).
If you aren’t familiar with the technique, in short, instead of creating an animation by rotating each bone of the character manually, we inform the IK system of our desired end position and let the code/math do the work for us.
As you can imagine, IK systems are super cool and come in really handy when you want to have dynamic animations that interact with the environment.
Some examples of common uses are:
- Making sure the footplacement of a character follows the orientation and height of the ground and obstacles. (foot placement on a staircase or rough terrain)
- Having a character press a button without knowing how the player will be positioned in front of the button.
- Having a character look at a point of interest
- …
In our case we make use of a Look-At IK. Which is a variant of an IK system specifically set up for bone chains that need to curve/rotate towards a specific point.
As if the bones are looking (hence the name) at that point in the distance.
Picking your IK solution
Unity (the engine we use for Trifox) actually comes with a build-in IK solution .
The only downside is that this implementation only works for humanoid bone structures.
So when you are dealing with more exotic characters that for example have multiple sets of legs or that require longer bone chains you may not always be able to achieve the results that you want.
In those cases you can either decide to write your own IK system, use a free solution that can be found on the web or use an asset store package dedicated to IK systems.
Final IK implementation
In Trifox we use Final IK for all our IK setups and needs.
It’s a feature complete IK solution created for Unity that offers the flexibility to basically create any IK setup that you want. It comes with a set of premade systems that are useful for common setups such as humanoid characters but the real interesting part is the ability to create your own, fully custom IK setups and constraints.
Below you can find an example of our basic look at configuration:
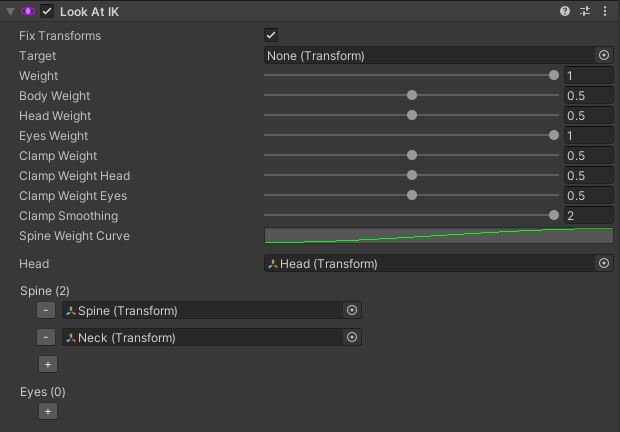
Important to note here is that we only use the Final IK asset for it’s IK solvers combined with our own control scripts.
The more elaborate interaction systems that come premade with the asset are left for what they are.
In essence we should be able to swap out our IK solution and all the behaviour and logic would remain intact (minus potential syntax change that would need to be made to adjust to the other IK solution).
Nice and smooth
In order to drive the head IK, an additional layer was added to control the Look-At IK component.
We want to make sure that transistions happen smoothly and don’t just jump around. Looking at your own head movements, even when moving really fast, it still takes some time and doesn’t snap from the start position to the end position.
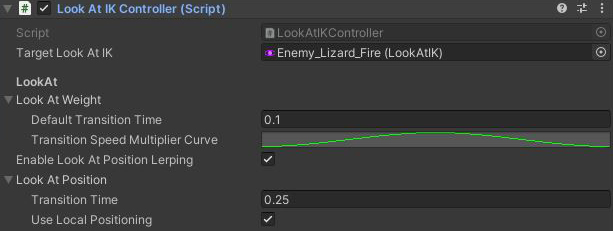
The only thing this driving component does is smoothen the transistions from one IK goal position to the next. It also provides a clean way to blend out the Look-At IK when we want to return to the default head animation. It’s a very obvious but often overlooked part when creating setups like these.
The central brain of the operation
With the Look-At IK in place we still need to have a way to drive the target position of the IK.
We might also want to have a centralized control script where we can disable the procedural animation setup as a whole or from where we can let our different elements communicate with eachother.
Lets call it the Procedural Animation Controller.
From this controller component we can then drive the look at position of our lizard.
In case of the Look-At, the IK target location is calculated each frame using a distance, a desired facing direction and a vertical offset relative to the root of our character. The vertical offset is used to ensure that our friendly lizards isn’t looking at the ground all of the time.
TLDR: We want the character to look at the point we are rotating towards.
Time to get moving (Action)
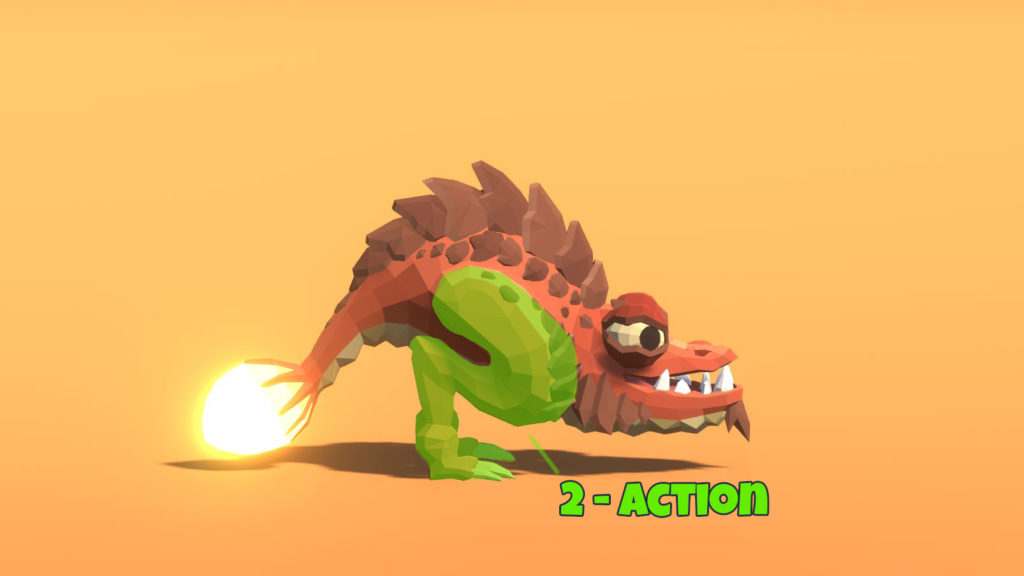
Next up, the real meat of the procedural movement operation, the leg movement.
Before starting out it always helps to break down the problem in to smaller sub problems and to set clear goals.
Defining our requirements
We know that our main goal is to have the legs move as if they are driving the movement of the lizard.
So if our character moves far enough , the leg should reposition itself in a believable fashion and to a valid location.
On top of that we also want to set up a system that can be reused for characters that have any arbetrary number of legs.
Additionaly, as multiple legs are allowed, it would be nice to have a system that avoids having all the legs moving at the same time.
This is to prevent the character from flying above the surface. It should always be grounded if possible.
Using these “rules” we can make informed decision on how to approach our setup.
- The legs will be split up into standalone components. That way any number of legs can be added and configured
- Each leg component should be able to track its positioning and select a valid new position based on movement direction and orientation of the character.
- Our only concern should be finding that end position and how the feet move to that position. Everything else will be handled by IK.
- A generalized “brain” (the procedural animation controller) will be needed to control whether or not a leg is allowed to move to ensure grounding of the character.
Setting up the IK
Just as with the look at, an IK solution was used to control the legs of the character.
Setting this up first greatly “simplified” all the following steps and helped with identifying any potential issues.
Plus, it’s way more fun to see you character move instead of looking at a series of debug lines and spheres 🙂 .
Positioning the legs
So how exactly are we calculating our valid leg positions? When should the leg move? How should the leg move?
These are all issues that need to be tackled. Luckily, in part because of our breakdown, the individual solutions aren’t all that complex.
Pehaps the best way to illustrate the process is via this video by @CodeerStudio.
It wonderfully illustrates the technique in 10 easy to understand steps.
In Trifox we actually used the same technique but with some differences in implementation and with a more elaborate prediction setup.
Procedural animation in 10 steps#madewithunity #unitytips #unity3d #gamedev #indiedev pic.twitter.com/nhbwIm5OV1
— Codeer (@CodeerStudio) March 28, 2020
Detecting when to move
As you could see in that excellent breakdown, the first step is to define a position that will be used as the reference position of our feet.
It’s the position that we want our character’s feet and legs to move towards when in rest and/or standing still.
Just as with our own movement as a human being, all other potential positions will be calculated relative to this reference position.
In other words, when the distance between our current foot placement and our reference position gets too big it is time to move.
The implementation above shows the setup in motion.
Movement of the legs only occurs in a single direction and the foot placement happens instantly.
Important to note is that we also force the rotation of the foot joint to be aligned with the floor. Depending on your rig and IK solution you might end up with the final joint pointing towards the target position. The feet would stick into the ground instead of being nicely grounded on the floor. In our case we want the control so we force the rotation.
Below you can see the same logic in action but this time with movement allowed in all directions.
Taking into account the movement aka “Adding overshoot”
The first noticable issue is the fact that the legs snap to the reference position and totally ignore the movement intent of the character.
As a result the legs always feel like they are trying to catch up instead of showing where our lizard is heading.
In order to fix this, an offset relative to the reference position is added in the movement direction of the character. This results in the character placing its feet ahead in the direction that we are moving.
Polishing the overshoot
An often overlooked aspect of adding an overshoot is adding an offset based on the movement direction of the legs.
At this point in our breakdown, the offset will be the same for all directions. The new position is basically locked to a circle around the reference position.
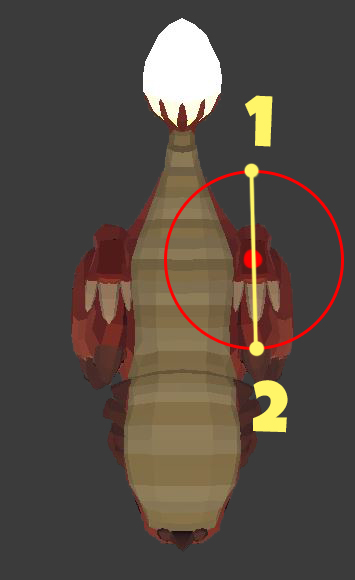
In a lot of cases this will be fine. However this isn’t really all that realistic.
Depending on the leg structure it doesn’t make sense to have the same foot placement offset in all movement directions.
You can easily test this yourself.
Pick a reference spot on the ground to stand on, the edge of a specific floor tile for example.
Then take 5 normals steps forwards followed by 5 normals steps backwards.
Don’t pay any specific attention to how you are performing your steps. Do them as you would normally.
You will notice that most people will not end up on the same spot.
The backsteps will be shorter, partially because you can’t see where you are headed.
In the case of our lizard and taking into account the shape of its legs we would much rather have an offset “circle” that looks like this:
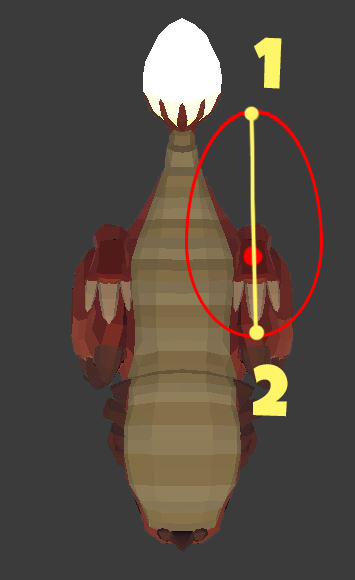
The legs are allowed to stretch a reasonable amount twards the back (as if pushing himself forward). While the forward offset remains within a regular circle distance.
In order to achieve this effect we made use of animation curves within unity.
Let’s take a look at the more technical implementation of this:
- First get the direction from the reference position to the current foot placement position.
- Get the DotProduct from this direction projected on the forward facing direction of the character.
When both normalized vectors point in the same direction then the dot product value will be 1.
If the vectors are eachothers exact oposite then the dot product value will be -1.
In case they are perpendicular then the dot product will be 0.
All values in between will results in transistion values between these extremes. - Use the DotProduct to evaluate an animation curve. This curve specifies what the maximum allowed offset is for that direction.

As an example the curve above will allow an offset of 1.5m towards the back ( DotProduct = -1) and 1m towards the front of the character (DotProduct = 1).
The transistion between both extremes is linear in this case.
So side movement will be allowed to have an offset of 1.25m (DotProduct = 0). - Check if the current distance exceeds the allowed offset distance for that angle using the value we just obtained from the curve.
- If true, then a reposition is required! Otherwise our check ends here.
- Perform another DotProduct, this time by taking the normalized movement direction and projecting that on the forward facing direction of the character.
- Just as in step 3 use the same curve and the newly calculated DotProduct to determine our desired offset.
- Apply the offset in the movement direction.
When written in code form you might end up with something like this:
Smoothening the movement
At this point the legs still snap into position. To fix this, a simple position lerp is used to smoothly transistion from the initial position to the next position.
During the transition you need to keep updating the target position relative to the character.
We are moving after all.
Not doing so would mean that by the time the foot touches the ground, the positioning will already be horribly outdated.
In order to facilitate this it’s best to normalize the transition.
Meaning that instead of lerping between 2 positions directly using time as the progression parameter, you use a percentage value as the progression parameter instead. This will not only result in a more consistent transistion. It also helps us keep track of how far we are in the transistion.
No more sliding!
Up next, getting rid of the sliding.
To fix the sliding, a height offset needs to be added as we move from one position to the next.
Because the transition is already normalized (see above) this becomes super easy to implement.
Just as with the footplacement calculations we make use of an AnimationCurve.
By defining a normalized vertical offset animation curve we can evaluate the curve using the transistion percentage and directly add the height to the current position of the foot.
In the example below our offset is 0 at time 0 (=start position). When we are about halfway (at time 0.5) then our footposition will have an offset applied of 0.5m upwards. And eventually at the end of our transistion, at time 1, our offset will once again be 0.

An added benefit of using the AnimationCurves is that it gives artistic freedom and control.
It also allows you to define the movement for each leg, exactly how you want it. (It also makes your artists and designers happy)
Taking into account rotation
Up until this point we only looked at linear movement. But what if the character is rotating on the spot? And what about rotating while running?
In our current state, on the spot rotating would only cause a foot placement activation if the reference position moves to far away from the reference position.
This results in the legs ending up entangled into all kinds of funky laws of physics bending positions.
To fix this, just as with the linear movement, an overshoot is added that takes into account the direction of the rotation and speed.
Additionally, an angle check is added that will force foot placement if the current angle the foot is placed in deviates too much from the reference rotation.
Shake that booty (Reaction)
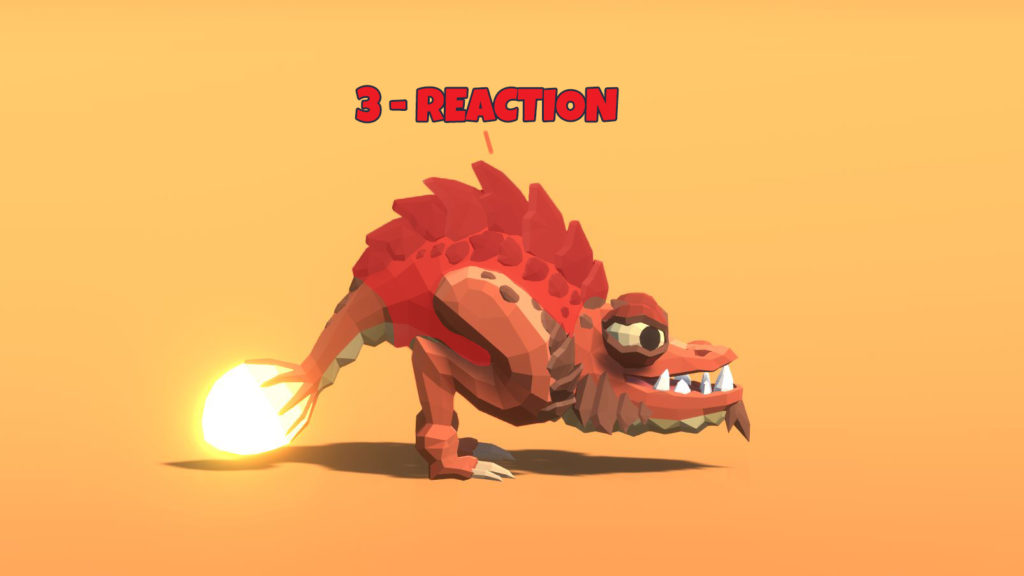
Bobbing around
With all the elements in motion it would be strange if the main body of the character remained still.
In order to add some vertical movement “bob” to the body we look at the current height of each of the feet relative to the height of the base of our character.
We then take the average of these values and use that as our “bob” offset height.
Doing this in our Procedural Animation Controller means that we get easy access to the different legs and their current states.
The calculated offset is then added to the default body height position of the character in rest.
Shaking it up
Alongside the bobbing, we also want to add some sway to the body based on the current leg positions.
This is done by looking at the current angle offsets of each of the feet relative to the root position, relative to the default angle offset of the reference position.
Say what now?
Let me explain:
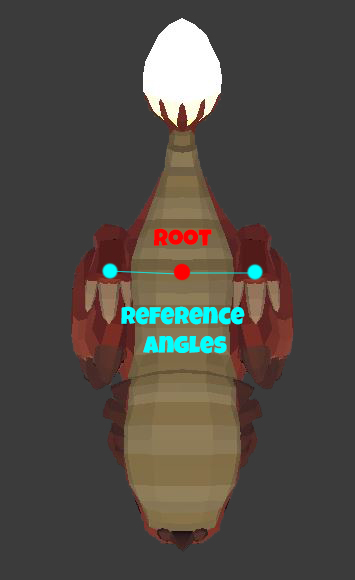
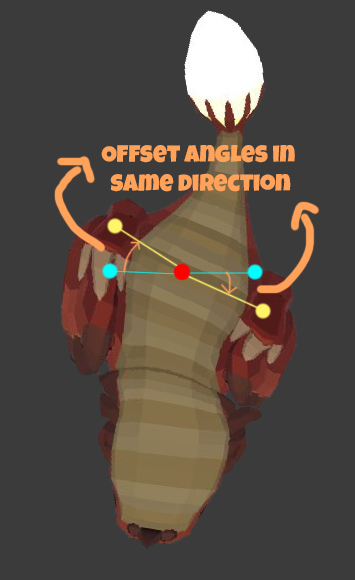
In the example above you can see that both legs have a relative rotation offset in the same direction.
If we add those 2 offsets and average them (divide by 2) we end up with a single offset value that is more or less matches the orientation of the yellow line from one foot to the other. This makes sense as both offsets were the same. So we end up with the rotation as shown.
If the 2 offset rotations would have been in oposite directions, then the average would have resulted in the rotations cancelling eachother out, leaving the overall rotation as is.
And so on and so forth.
In order to calculate the average it’s important to take into account all legs.
It also simplifies things greatly if you average out your calculations using euler angles instead of working with quaternions.
In our case some dampening was also added to the final calculated rotation offset that we want to apply.
Because the leg positioning can end up having a rather large spread, the offset angles can get big. This is partially controlled by the design of the character.
Directly applying the rotation offset without some limiting applied would be too comical for the character and his role as an enemy. Hence the need for the dampening.
As a side note. Messing up your calculations could result in some unwanted effects… .
Adding the finishing touches
Almost there :D!
In order to fully finish up our setup there are 2 more elements that are still missing.
- Grouping the legs – Allowing alternating leg movement
- Flavour – Adding secondary animations (the 5th bonus element that was mentioned before)
Grouping the legs
It can happen that when moving in a straight line, both legs will move at the same time.
As a result it seems as if the character is making small jumps instead of actually running.
In order to avoid this we introcuded the concept of leg groups.
Here is what these do:
- A leg group can contain as many legs as needed.
- When a leg group is active, all legs in that group are allowed to move.
- When a leg group is finished moving, the next leg group is allowed to move. (= sequencing)
- The first leg group that starts moving is the initial group.
Using this we can ensure that the movement feels believable and grounded.
It also allows us to scale up to as many legs that we want and have them all moving in sequence.
Here is a look at the final result of our procedural movement with no additional animation layers added:
When using this setup it’s also important to define a maximum allowed distance that a leg can stray away from the reference position.
For example when dealing with multiple groups, all taking their sweet time to transistion.
By the time the first group is allowed to move again, the leg could be locked in to place stretching 4m behind the character.
Adding this “escape distance” allows the leg to move no matter what in case the offset become too big. Even when the leg is not part of the current active leg group.
(In our case, this offset is defined by multiplying the allowed offset distances used for the foot placement calculations.)
Flavour – Adding secondary animation support
With all of the locomotion taken care of, additional animations can be added on top.
Things like idle animations, eye movements, mouth movements and any other element that adds some additional flair and personality to the character.
In our case we also needed this in order to support the attack animations.
As a bonus, the entire procedural animation system can be blended in and out.
So when we want to play a rootmotion animation, the animation can take over and then gradually fade back to the procedural animation once the animation is finished.
The key here is providing control to the artists, designers and programmers to do what is needed for the character.
Wrapping things up
Congratulations! You made it to the end 😀
A quick recap
In this post we went over how we solved our problem when dealing with complex character locomotion animations and the thought process behind it.
We identified that there were 5 elements required to create a believable character using procedural animations (at least in our case) and dived into our solutions for them.
- Intent
The head should indicate the desired movement direction and rotation. Enhancing the player feedback of what the character is doing. - Action
This is core movement of the procedural animation, the locomotion, the movement that drives it all, the positioning and animation of the legs. - Reaction
The body should respond to the action. If the leg moves so should the body to enhance and sell the movement. - Follow Through
The tail should follow the movement of the rest of the body, it’s the dangly bit that goes wherever you go but with a tiny delay. Completing the movement of the character. - Flavour
Additional animations that give flair and personality to our character.
Get in touch
I hope this article provided some insight on how you can leverage the power of procedural animation to solve a problem like the one we were having and on how to approach problems in general when it comes to game development.
Last but not least, feel free to join our Discord and follow us on Facebook and Twitter.
And ofcourse don’t forget to Wishlist the game on Steam. Each wishlist does matter to us and helps us out a great deal!
Wishlist Trifox Now!
Until next time!
-Brecht
Bonus: Some excellent procedural animation tutorials/breakdowns
As mentioned at the start of this article, there are some excellent breakdowns and tutorials out there that go into great detail on how to set up a procedural locomotion system for your game. Covering different aspects than the onces mentioned in this post.
Here are 2 of my favourites so far that do a superb job at giving an in-depth and more technical overview on how you could approach setting up your own procedural locomotion system. Go check them out!
Procedural animation in 10 steps#madewithunity #unitytips #unity3d #gamedev #indiedev pic.twitter.com/nhbwIm5OV1
— Codeer (@CodeerStudio) March 28, 2020
It took a bit more time than expected, and ended up on the longer side, but the Bonehead procedural animation tutorial is out!
— https://t.co/K9QiKysV8S — pic.twitter.com/PDPA0ged95— WeaverDev (@Weaver_Dev) August 22, 2019

The models are amazing y’all! very interesting art style I love it
Thank you 🙂
I just stumbled upon this blog right now. Thank you so much for writing and sharing in detail how you worked with procedural animation! Amazing work and for someone like myself struggling to learn it, this is an awesome step-by-step guide to study! Thanks <3
Excellent article and great work 👍